Difference between revisions of "Marspedia Tutorials"
| (16 intermediate revisions by 2 users not shown) | |||
| Line 1: | Line 1: | ||
| + | [[Category:Mars Outreach]] | ||
==Tutorial Introduction== | ==Tutorial Introduction== | ||
===What is Marspedia?=== | ===What is Marspedia?=== | ||
| − | Marspedia is an encyclopedia that summarizes topical knowledge about Mars and references where greater detail can be obtained. Marspedia is focused on providing the best source of information about past, present, and future exploration and settlement of Mars, including all of the tools, techniques and technologies that will be needed to do so. This is the goal of The Mars Society and that is why The Mars Society sponsors and manages Marspedia. | + | [[Home|Marspedia]] is an encyclopedia that summarizes topical knowledge about [[Mars]] and references where greater detail can be obtained. Marspedia is focused on providing the best source of information about past, present, and future exploration and settlement of Mars, including all of the tools, techniques and technologies that will be needed to do so. This is the goal of The Mars Society and that is why The Mars Society sponsors and manages Marspedia. |
| − | This emphasis and focus on the future is what energizes the volunteers of The Mars Society and Marspedia. We hope that you will want to make Marspedia the best source of information on all topics related to exploring and settling the Red Planet. | + | This emphasis and focus on the future is what energizes the volunteers of The [[Mars Society]] and Marspedia. We hope that you will want to make Marspedia the best source of information on all topics related to exploring and settling the Red Planet. |
| − | Are there any requirements to become a member of the Marspedia Team | + | Are there any requirements to become a member of the Marspedia Team? Other than some comfort in using a browser and text editor on your favorite computer, phone or touchpad and willingness to bring your enthusiasm, there are no formal requirements. We do ask that if you want to contribute to the Marspedia Project, you should continue this series of tutorials to learn how. |
===Marspedia is a wiki based website.=== | ===Marspedia is a wiki based website.=== | ||
| Line 27: | Line 28: | ||
If you haven’t done so already, link to Marspedia and request an account by clicking Guest. Actions are denoted by red circles or boxes in the accompanying figures. | If you haven’t done so already, link to Marspedia and request an account by clicking Guest. Actions are denoted by red circles or boxes in the accompanying figures. | ||
| − | + | [[File:MT1 GuestLogin.jpg|thumb|600x600px|Guest Login|alt=|none]] | |
| − | |||
When you select Guest you’ll see a drop-down menu that lets you select Request Account or Log in. Click Request Account if you don’t have one already. You will receive an email notification within a few days that the account is ready for “Log in.” | When you select Guest you’ll see a drop-down menu that lets you select Request Account or Log in. Click Request Account if you don’t have one already. You will receive an email notification within a few days that the account is ready for “Log in.” | ||
| − | + | [[File:MT2 RequestAccount.jpg|thumb|600x600px|Login or Request account|alt=|none]] | |
| − | |||
===Creating a User page=== | ===Creating a User page=== | ||
| Line 42: | Line 41: | ||
Steps to create a User page. | Steps to create a User page. | ||
| − | + | [[File:MT3 Search Marspedia.jpg|thumb|alt=|none|600x600px|The Marspedia Search Box circled]] | |
FIG Marspedia search box graphic | FIG Marspedia search box graphic | ||
| Line 79: | Line 78: | ||
Notice the blue box above the Contents box that looks like this… | Notice the blue box above the Contents box that looks like this… | ||
| + | [[File:MT4 VisualEditorPracticePage.jpg|thumb|alt=|none|Visual Editor test page link]] | ||
| − | + | *Click on "Here is a page" where you can freely test it. | |
| − | |||
| − | *Click on Here is a page where you can freely test it. | ||
*In the popup box Click Start editing. | *In the popup box Click Start editing. | ||
*A notice drops down to notify you that you are not logged in. That’s OK. You’ll also see this page notice that you can click to reset the sandbox | *A notice drops down to notify you that you are not logged in. That’s OK. You’ll also see this page notice that you can click to reset the sandbox | ||
| − | + | [[File:MT5 ResetSandbox.jpg|thumb|alt=|none|Reset Test page ]] | |
| + | Notice that the Test page in not permanent. The Sandbox can be reset. | ||
*Do so. This will remove any previous changes to the page by others and allow you to edit the original page. | *Do so. This will remove any previous changes to the page by others and allow you to edit the original page. | ||
| Line 94: | Line 93: | ||
Let’s look first at the top menu in this VisualEditor. | Let’s look first at the top menu in this VisualEditor. | ||
| − | + | [[File:MT6_MediawikiVisuallEditorMenu.jpg|alt=]] | |
This is the tool bar you will use to edit. Note: If you have scrolled a page or more into the text , the bar may disappear off the top of the screen, but you can leave your cursor where you want to make an edit and scroll back to the top menu to click on the appropriate editing tool as explained in the examples below. | This is the tool bar you will use to edit. Note: If you have scrolled a page or more into the text , the bar may disappear off the top of the screen, but you can leave your cursor where you want to make an edit and scroll back to the top menu to click on the appropriate editing tool as explained in the examples below. | ||
| Line 114: | Line 113: | ||
*Click Edit | *Click Edit | ||
*Click Change Image. | *Click Change Image. | ||
| − | |||
| − | + | Scroll down in the existing image files and find a new graphic like the Visual Editor Parsoid yellow flower to the right and select it. | |
| + | |||
| + | Click Use this Image.[[File:MT7 ParsoidGraphic.jpg|thumb|alt=|none|Mediawiki graphic]] | ||
| − | |||
*Click Apply Changes. | *Click Apply Changes. | ||
*The new graphic will display. | *The new graphic will display. | ||
| Line 139: | Line 138: | ||
Notice the box below the selected table entry. It looks like this… | Notice the box below the selected table entry. It looks like this… | ||
| − | + | [[File:MT8 TableProperties.jpg|thumb|alt=|none|Click Properties to edit table]] | |
| − | |||
*Click Properties. | *Click Properties. | ||
| Line 152: | Line 150: | ||
*Scroll down to see the 4 column by 4 row blank table. By adding text and eliminating extra rows and columns you should be able to develop this table (shown below) in short order. | *Scroll down to see the 4 column by 4 row blank table. By adding text and eliminating extra rows and columns you should be able to develop this table (shown below) in short order. | ||
| − | + | [[File:MT9_TableExample.jpg|alt=]] | |
*Remember: If you make an editing mistake you can leave the page and open it again to reset the sandbox. | *Remember: If you make an editing mistake you can leave the page and open it again to reset the sandbox. | ||
| Line 177: | Line 175: | ||
Note that the word now has a special icon after it. It looks like this | Note that the word now has a special icon after it. It looks like this | ||
| − | + | [[File:MT15 ExternalLinkSymbol.jpg|none|thumb|Symbol]] | |
| − | |||
The word is now hotlinked to an external URL, but this reference does not appear in the list of cited references at the bottom of the page. | The word is now hotlinked to an external URL, but this reference does not appear in the list of cited references at the bottom of the page. | ||
| Line 219: | Line 216: | ||
*Scroll to bottom and you’ll see that Practice Pages has been added to Categories. | *Scroll to bottom and you’ll see that Practice Pages has been added to Categories. | ||
| − | + | [[File:MT10 AddCategoryExample.jpg|thumb|alt=|none|Add Category]] | |
| − | |||
Note: You’ll see Practice Pages in red (an indication that it is not officially a category in MediWiki, since it hasn’t been defined yet with its own category page). Don’t worry about the red type- we’re just playing in the sandbox, but and it’s time to reset the sandbox for others, since we are going to move to the Marspedia website for the next tutorial. So before you go, click Edit and reset the sandbox. | Note: You’ll see Practice Pages in red (an indication that it is not officially a category in MediWiki, since it hasn’t been defined yet with its own category page). Don’t worry about the red type- we’re just playing in the sandbox, but and it’s time to reset the sandbox for others, since we are going to move to the Marspedia website for the next tutorial. So before you go, click Edit and reset the sandbox. | ||
| Line 258: | Line 254: | ||
*Click Categories. | *Click Categories. | ||
| − | + | [[File:MT11 MarspediaCategoryList.jpg|thumb|alt=|none|Marspedia Category List]] | |
As shown above a box opens allowing you to select a category to apply to your User page. | As shown above a box opens allowing you to select a category to apply to your User page. | ||
| Line 301: | Line 297: | ||
*Click Insert/Media | *Click Insert/Media | ||
| − | *Click the Upload tab in the Media Settings | + | *Click the Upload tab in the Media Settings drop-down box. |
| − | + | [[File:MT12 UploadOwnWorkFile.jpg|thumb|alt=|none|Upload your own work or click default upload pg.]] | |
*If this is your own work, click the check box and drop the file into the Select File box for uploading. | *If this is your own work, click the check box and drop the file into the Select File box for uploading. | ||
*If this is NOT your work, then you should click “the default upload page” link which loads an input box that looks like this | *If this is NOT your work, then you should click “the default upload page” link which loads an input box that looks like this | ||
| − | + | [[File:MT13_UploadExternalFile.jpg|alt=|none|thumb]] | |
| − | |||
Note that only image files of types: png, gif, jpg, or jpeg; will display in Marspedia. The other file formats (pdf, xls, etc.) can only be viewed by downloading the file to a user’s computer/device and using the relevant app to view them. | Note that only image files of types: png, gif, jpg, or jpeg; will display in Marspedia. The other file formats (pdf, xls, etc.) can only be viewed by downloading the file to a user’s computer/device and using the relevant app to view them. | ||
| Line 317: | Line 312: | ||
These are the licenses accepted by Marspedia. | These are the licenses accepted by Marspedia. | ||
| − | [[File: | + | [[File:MT14 Licensing options.jpg|alt=]] |
'''Public Domain''': no license and the image is freely used and has no owner. Identical to Creative Common Zero (CCO). | '''Public Domain''': no license and the image is freely used and has no owner. Identical to Creative Common Zero (CCO). | ||
| Line 381: | Line 376: | ||
*Use the Category Tree links in the Definitions of the Top-Level Categories to determine the exact spelling of each category or subcategory. | *Use the Category Tree links in the Definitions of the Top-Level Categories to determine the exact spelling of each category or subcategory. | ||
| − | Let’s choose to use the category “Mars Society” Write it down for reference. | + | Let’s choose to use the category “Mars Society”. Write it down for reference. |
Now go back to your User page. This time click Edit Source in the top menu. You will see all the text on your page in plain text type and you may see some other characters like ====. These are wikitext tags - (you may be familiar with xml tags) that help to format the page for html display to your browser. If you want to learn more about these tags and how you can add them to the plain text editor, you can check out https://meta.wikimedia.org/wiki/Help:Wikitext_examples | Now go back to your User page. This time click Edit Source in the top menu. You will see all the text on your page in plain text type and you may see some other characters like ====. These are wikitext tags - (you may be familiar with xml tags) that help to format the page for html display to your browser. If you want to learn more about these tags and how you can add them to the plain text editor, you can check out https://meta.wikimedia.org/wiki/Help:Wikitext_examples | ||
Latest revision as of 14:27, 26 July 2022
Contents
- 1 Tutorial Introduction
- 2 Tutorial A - Getting an Account and Learning about the MediaWiki VirtualEditor (for Marspedia editing)
- 3 Tutorial B - Getting Started - Editing with the VisualEditor
- 3.1 Example: Editing a graphic
- 3.2 Example: Editing Tables
- 3.3 Example: Inserting a new Table
- 3.4 Example: Adding a Cited (numbered) reference
- 3.5 Example: Adding a hotlink to an external URL to a word or phrase in the text
- 3.6 Example: Adding a hotlink from another wiki page to a word or phrase in the text
- 3.7 Example: Adding a Cited References List at the end of the article
- 3.8 Example: Adding Categories to the article
- 4 Tutorial C - Serving as a Marspedia Reviewer/Editor or Contributor
- 5 Tutorial D - Adding Graphics to a new Marspedia Page
- 6 Tutorial E - Advanced Editing - Introduction to Wikitext (Wiki markup code) and the SourceEditor
- 7 Tutorial F - Adding Categories to a Marspedia page using the SourceEditor
Tutorial Introduction
What is Marspedia?
Marspedia is an encyclopedia that summarizes topical knowledge about Mars and references where greater detail can be obtained. Marspedia is focused on providing the best source of information about past, present, and future exploration and settlement of Mars, including all of the tools, techniques and technologies that will be needed to do so. This is the goal of The Mars Society and that is why The Mars Society sponsors and manages Marspedia.
This emphasis and focus on the future is what energizes the volunteers of The Mars Society and Marspedia. We hope that you will want to make Marspedia the best source of information on all topics related to exploring and settling the Red Planet.
Are there any requirements to become a member of the Marspedia Team? Other than some comfort in using a browser and text editor on your favorite computer, phone or touchpad and willingness to bring your enthusiasm, there are no formal requirements. We do ask that if you want to contribute to the Marspedia Project, you should continue this series of tutorials to learn how.
Marspedia is a wiki based website.
What is a wiki? Ref: https://en.wikipedia.org/wiki/Wiki A wiki is a knowledge base website on which users collaboratively modify and structure content directly from a web browser. In a typical wiki, text is written using a simplified wikitext markup language and often edited with the help of a rich-text editor - the VisualEditor in Marspedia and MediaWiki.
MediaWiki is a free and open-source wiki engine. It was developed for use on Wikipedia in 2002, and given the name "MediaWiki" in 2003. It remains in use on Wikipedia and almost all other Wikimedia websites. Its development has been coordinated by the Wikimedia Foundation.
If you are interested in preparing or have already prepared a paper with text, tables and graphics, and you want to add an article to Marspedia, ask yourself these questions:
- Does it fit in a category included in Marspedia? Go to https://marspedia.org/Marspedia:New_Category_Hierarchy to examine the hierarchical list of Categories covered in Marspedia. You will want to tag your article with 1-3 of those categories after you add it to Marspedia. In the tutorials that follow we’ll show you how.
- Are you willing to summarize a long (greater than 3-5 pages) paper into a Marspedia article and reference the full paper stored elsewhere on internet? Why do we ask this question? Because Marspedia is an encyclopedia - not a book, journal, or archive for complete chapters or papers.
- Are you interested in reviewing and improving the Marspedia content submitted by others?
If you have answered yes to one or more of these questions, then continue with this series of tutorials.
Tutorial A - Getting an Account and Learning about the MediaWiki VirtualEditor (for Marspedia editing)
The best way to add your content to Marspedia or to help us review contributions is to become a member of the Marspedia Project and request an account. Here’s how…
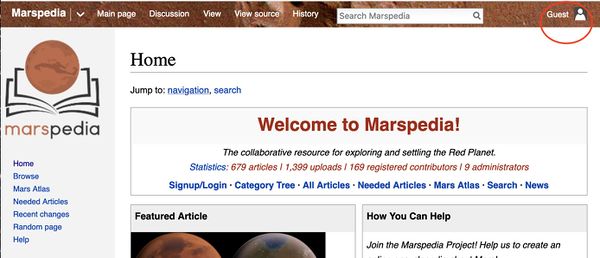
If you haven’t done so already, link to Marspedia and request an account by clicking Guest. Actions are denoted by red circles or boxes in the accompanying figures.
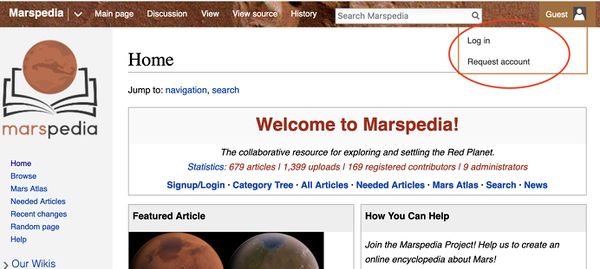
When you select Guest you’ll see a drop-down menu that lets you select Request Account or Log in. Click Request Account if you don’t have one already. You will receive an email notification within a few days that the account is ready for “Log in.”
Creating a User page
Before you start the Tutorial, we suggest that you create a User page in Marspedia. You are encouraged to set up your User page with a short ID and bio (or anonymous if you choose), list your computer skills/experience, and MarsSociety experience. This will help the Editorial team in seeking members with experience for a particular future project.
You can also use this page as scratch pad to try out editing tools and techniques, and you can always delete scratch space after each session. We’ll show you how.
To get started, Click Help from left menu. In the box that appears, notice the help links in the Editing category, and read the help file about “User page.”
Steps to create a User page.
FIG Marspedia search box graphic
- Type "User:<YourUserName>" into the top right Search Marspedia box.
- A page will display indicating that you may create this page.
- Click on create this page
- Type in your name or other text into the box.
- Click Save Page.
Your User:<Yourname> page will be saved and can be edited in the future by searching for User:<YourUserName> in the Search Marspedia box.
Taking a quick look at the Visual Editor
Go to https://www.mediawiki.org/wiki/Help:VisualEditor/User_guide
In preparation for the tutorial that follows, quickly scan the Visual Editor help pages. Notice how similar the menu is to other text editors that you have been using such as MS Word, WordPress, etc. You don’t need to study these pages in depth. The tutorials below will give examples of the editing sequences that you will most commonly use. Note that the wiki help files are on a different wiki website called MediaWiki. You won’t have an account on this site. You’ll simply use the help files and a VisualEditor practice page to try out the editing options in the next Tutorial B.
Tutorial B - Getting Started - Editing with the VisualEditor
In Tutorial A, you learned how to create a New page (the User page). In this tutorial you will learn about:
- Editing a Graphic
- Editing a Table
- Inserting a new Table
- Adding a Cited Reference
- Adding a text hotlink to an external URL or another wiki page
- Adding a Cited Reference List at the end of the article
- Adding a Category to the article
We’ll assume you have completed Tutorial A, so that you have your account ID/password for Marspedia, you have set up a User page which you can use as a scratch pad in the future to try out editing tools, and you have skimmed the User Guide for the Visual Editor.
One of the volunteer activities of the Marspedia Project involves reading newly submitted pages and editing them for improved content, layout, and assigned categories. In this tutorial we’ll take you through examples of editing tools used in that process.
Even if you plan to jump right in and become a contributor of new content for Marspedia, you should follow this tutorial which introduces you to the commonly used editing tools.
Now we’ll use the MediaWiki website to practice some editing. Click this URL https://www.mediawiki.org/wiki/Help:VisualEditor/User_guide
Notice the blue box above the Contents box that looks like this…
- Click on "Here is a page" where you can freely test it.
- In the popup box Click Start editing.
- A notice drops down to notify you that you are not logged in. That’s OK. You’ll also see this page notice that you can click to reset the sandbox
Notice that the Test page in not permanent. The Sandbox can be reset.
- Do so. This will remove any previous changes to the page by others and allow you to edit the original page.
- Then click Start Editing and close the warning box at the x in the upper right corner.
- Scroll around this VisualEditor:Test page and you’ll see that there are many examples of graphics, tables, lists, equations and even poetry on which to practice our editing.
Let’s look first at the top menu in this VisualEditor.
This is the tool bar you will use to edit. Note: If you have scrolled a page or more into the text , the bar may disappear off the top of the screen, but you can leave your cursor where you want to make an edit and scroll back to the top menu to click on the appropriate editing tool as explained in the examples below.
Hovering over the icons in the tool bar will display the name of the icon. Clicking the carets to the right of an icon will display additional options to choose. The important editing icons are briefly noted here…
- The Paragraph icon has options that reformat selected text with specific heading levels.
- The StyleText A icon restyles the characters as bold, subscript, etc.
- The Links icon (a chain) will add a wiki or external link to selected text
- The List-Structure icon will create a list of your selected text
- The Insert Icon allows you to add Graphics, Tables and Cited References at the cursor
- The Page Options (“hamburger”) icon is used to set Categories
- The SwitchEditor (pencil) icon allows you to switch to the SourceEditor, described in Tutorial E.
- The Publish changes blue button will save the editing changes.
Example: Editing a graphic
- Click on the Blue Marble graphic
- Click Edit
- Click Change Image.
Scroll down in the existing image files and find a new graphic like the Visual Editor Parsoid yellow flower to the right and select it.
Click Use this Image.
- Click Apply Changes.
- The new graphic will display.
- Click Edit in the image dropdown box
- Click Advanced.
- Click Center image
- Change the Custom size of the image to 300 x 172 px
- Click Apply changes
The image is resized and centered and text is above and below it. Note: you can click and drag the image up or down to move it between other lines of text. Try it.
Now,
- Publish Changes
- Reenter Edit by clicking Edit in the top menu.
- You should find your flower graphic where you last left it in the text.
Example: Editing Tables
To edit text in the table in the Fantasy Worlds section, double click a table entry in any row/column box and start editing or deleting text. The selected entry shows with a blue background and you’ll notice two carets (arrow heads) to the left of the selected row and to the top of the selected column. By clicking a caret you will see options to add or delete rows or columns to the table. You can also move (exchange) a particular row or column in the table.Try it.
Notice the box below the selected table entry. It looks like this…
- Click Properties.
- There are options to make the table collapsible and or sortable, although these options don’t manifest themselves until you Save Change to the page and examine it in browser read only mode without the editor.
- Try making the table collapsible and sortable, saving the changes, and then publishing the changes to see these actions in your browser.
Example: Inserting a new Table
Let’s create a new Table just above the Fantasy worlds section. Use your cursor and the return key to create a few blank lines for entering a table. and park the cursor there.
- Scroll up to the menu bar and select Insert/Table.
- Scroll down to see the 4 column by 4 row blank table. By adding text and eliminating extra rows and columns you should be able to develop this table (shown below) in short order.
- Remember: If you make an editing mistake you can leave the page and open it again to reset the sandbox.
Example: Adding a Cited (numbered) reference
In the World Health section, look at the references denoted by brackets and numbers - [1], [2], etc. on this page. These are cited references.
Suppose you have a wikipedia page on “depression” at https://en.wikipedia.org/wiki/Depression_(mood) that you want to reference after the word “depression” at the end of 2nd sentence in 2nd paragraph.
- Put the cursor after “depression.”
- Click Insert/more/Basic reference in the VisualEditor top menu,
- Paste in the URL in the upper box and Click Insert.
Notice that this reference has been added as [2] and the others after it have been renumbered. The cited reference has also been added to the Footnotes list at the end of the article.
Example: Adding a hotlink to an external URL to a word or phrase in the text
In the World Health section,
- Select the entire word “depression” at the end of 2nd sentence in 2nd paragraph
- Click the Insert (chain) icon
- Click External site
- Copy the “depression” URL link from the last example (https://en.wikipedia.org/wiki/Depression_(mood)) to the box.
- Click Done.
Note that the word now has a special icon after it. It looks like this
The word is now hotlinked to an external URL, but this reference does not appear in the list of cited references at the bottom of the page.
Example: Adding a hotlink from another wiki page to a word or phrase in the text
- Select the heading “Gallery” above the photos of the planets near the end of this article.
- Click the Insert (chain) icon
- Select MediaWiki
- Type Gallery into the box
- Click the “Gallery (redirect to Help:images)“ item...You have now linked the text word Gallery to The Gallery Syntax section of the Help:Images page in MediaWiki.
- Click Publish Changes
This hotlinking can be useful in adding links to related articles that might elaborate on a topic or concept in the article that you are editing.
Example: Adding a Cited References List at the end of the article
If you were creating a new article you would have preceded to this point by adding all your cited references as you typed in the text. Now you want to add the complete list of cited references at the bottom and rename the list “References” instead of “Footnotes.”
- Let’s delete the current reference list first
- Click somewhere in the list of Footnotes. The selected box of references turns blue.
- Then hit delete to remove the reference list.
- Select the entire word Footnotes and type in References to replace it in the same font and heading style.
- You want the reference list to appear immediately after the word References so leave your cursor after the word “References”.
- Scroll up and click Insert/more/References list
- The list will appear at the cursor and after References.
Note that the list will be placed wherever the cursor is parked. So be careful. You can always delete the reference list and then move the cursor to where you want the list be be before you again click Insert/…/Reference list.
Example: Adding Categories to the article
Categories are used to label pages related by some common theme. This is useful to readers focusing on particular topics and related pages. Notice that there is a Category assigned to this page on the last line in the article in a gray box. It says Categories: Pages using PMID magic links
We’re going to add a new category called Practice Pages.
If you are not already in edit mode on this VisualEditor:Test page link to https://www.mediawiki.org/wiki/VisualEditor:Test
- Once in the Visual Editor
- Click Page Options (hamburger)/Categories
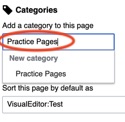
- Type in “Practice Pages” in the add category box and then click on “Practice Pages” that shows up in the New category box below your original typing.
- Click Apply changes and then Publish changes
- Scroll to bottom and you’ll see that Practice Pages has been added to Categories.
Note: You’ll see Practice Pages in red (an indication that it is not officially a category in MediWiki, since it hasn’t been defined yet with its own category page). Don’t worry about the red type- we’re just playing in the sandbox, but and it’s time to reset the sandbox for others, since we are going to move to the Marspedia website for the next tutorial. So before you go, click Edit and reset the sandbox.
Tutorial C - Serving as a Marspedia Reviewer/Editor or Contributor
In this tutorial you will learn
- Accessing Special Pages
- The Marspedia Category Hierarchy
- Adding Marspedia Categories to articles
- Adding a cited reference to a Marspedia article
Examining the Recent changes, Needed Articles, or Special pages
A Marspedia Reviewer/Editor reviews recently submitted articles and provides minor editing for consistency and connection to related articles in Marspedia. A reviewer uses the Recent changes list. A contributor will wish to examine the Needed Articles pages where many needed contributions to Marspedia are listed. Both may wish to examine the Special pages associated with the Marspedia wiki.
- Open https://marspedia.org/Home.
- Notice the column of blue linkables under the Marspedia logo in the top left corner.
- Click on Recent changes or Needed articles or Special Pages to find the relevant pages.
Any or all of these lists may suggest places to start when reviewing or writing articles.
The Marspedia Category Hierarchy
Both Reviewers and Contributors should become familiar with the Marspedia hierarchy of categories. This knowledge may help you decide which pages to review and edit based on your interests/experience or on what topics to contribute your knowledge.
- Search for Marspedia:New Category Hierarchy in the Marspedia search box.
- Read why Marspedia chose to limit the set of categories to just those in the hierarchy. Examine the outline of the three level category hierarchy and above it note the six top level categories description.These top level categories have links to the Category Tree.
- Click one of these top level categories and you will see the next level of subcategories and the number of the sub-subcategories (C) and the number of pages (P) associated with the subcategories. The category tree provides a rapid path to all related articles and helps to identify the need for related contributions.
Adding Categories with VisualEditor and the Marspedia category list.
As a reviewer, you may know more about all that is on Marspedia than a recent contributor may know. For instance you may want to add a link to another related page that expands on a subtopic or clarifies a term in an article you are editing. Some pages recently added to Marspedia may not have categories attached or may have categories that are not in the Marspedia category hierarchy. Perhaps you know there is another category that also fits the article well and you want to add it.
Marspedia has a special Category selection box that limits the choice of categories to only those in the Marspedia Category Hierarchy. Let’s see how this works with the VisualEditor.
- Log into Marspedia
- Go to your user page by typing User:<yourname> in the search box.
- Enter Edit Mode by clicking on Edit in the top menu.
- Click the hamburger icon next to the pencil.
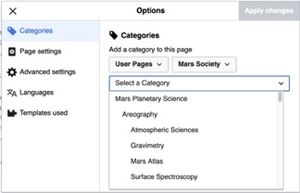
- Click Categories.
As shown above a box opens allowing you to select a category to apply to your User page.
- Scroll down to Mars Outreach and select it.
- Click Apply changes to add this category to your user page.
PLEASE NOTE: Currently the Category Apply Changes operation is not working and stays greyed out as shown in the above graphic. Read Tutorial F for the alternative method of assigning a category to a Marspedia page using the SourceEditor.
Adding a cited (numbered) reference to a Marspedia page
The Marspedia VisualEditor has a slightly different top menu than the one you used on the MediaWiki practice page in Tutorial B. . The Marspedia VisualEditor has a Cite icon after the Link (chain) icon and you will use this to add cited references. Once you click Cite/Basic you have the same input sequence for a cited reference as described in Tutorial B.
Why are the VisualEditor menus different? Wikis don’t always have the latest version of the these tools. Updates can come along several times a year. It is what it is…
Tutorial D - Adding Graphics to a new Marspedia Page
If you plan to contribute new content to Marspedia, you will likely want to add a graphic or a photo to your page to illustrate the text and tables of your article. In this tutorial we’ll examine use of existing graphic content in the wiki net or uploading a new graphic from your computer/device to Marspedia.
Adding a graphic for your page from a wiki website.
Using graphics from a wiki website is like borrowing the graphic. You will embed the graphic in your page, but the graphic will be linked back to the Image file that is stored elsewhere in Marspedia or on another wiki.
All graphics on many wikis are required to be public domain, so it’s a clean way to know you can use a graphic that already appears on another wiki and that its history has already been described by another person. You don’t have to add an attribute or ask permission to use a wiki graphic.
Searching for Graphics in the wiki system.
Suppose that you have read an article in Marspedia (or any other wiki) and you note a graphic that you want to include on your article page. Here’s how.
- Go to the page that displays the graphic
- Double click the graphic to determine its File:<name> in that wiki.
- Copy the URL link that you find on the File: description page.
- With your cursor where you want to add the graphic on your page,
- Click Insert/Media in the top menu
- When the Media Settings box opens, Paste the graphic URL into the Search field.
- Click the Use this Image tab
That will link the graphic to your page and it will appear at your cursor position. To manipulate the graphic’s position and size, review how to do that in Tutorial B.
Note that a reader of your article can click the graphic and then the hotlink to display the File: description in the wiki system you copied it from.The reader can then download the file in its originally uploaded form.
Uploading a new graphic
Marspedia allows media under several kinds of licenses to be added, not just public domain graphics, but you should be sure you understand the licensing details and restrictions to its use before you decide to use these graphics from external (non-wiki) sources. Make sure you know the source of the graphic and whether there are any restrictions to its use.
To upload a graphics file from your computer/device
- Click Insert/Media
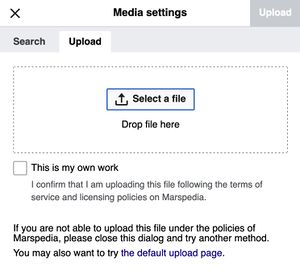
- Click the Upload tab in the Media Settings drop-down box.
- If this is your own work, click the check box and drop the file into the Select File box for uploading.
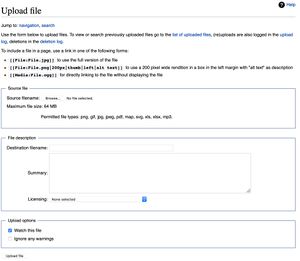
- If this is NOT your work, then you should click “the default upload page” link which loads an input box that looks like this
Note that only image files of types: png, gif, jpg, or jpeg; will display in Marspedia. The other file formats (pdf, xls, etc.) can only be viewed by downloading the file to a user’s computer/device and using the relevant app to view them.
- Fill in the Destination File name and Summary box.
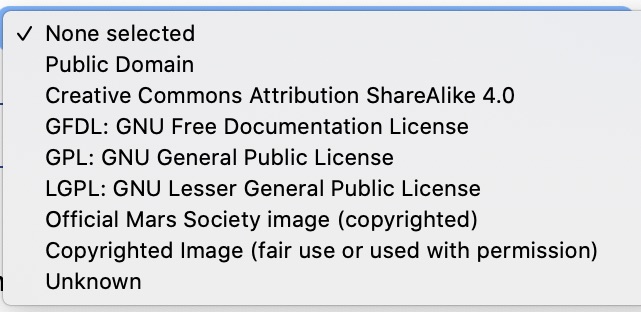
- Click the Licensing box and choose the License Type.
These are the licenses accepted by Marspedia.
Public Domain: no license and the image is freely used and has no owner. Identical to Creative Common Zero (CCO).
Creative Commons Attribution Share-Alike 4.0: a specific license allowing broad usage, as long as the author of the image is attributed.
GFDL: GNU Free Documentation License -- see this website for details.
GPL: GNU Public License -- see this website for details.
LGPL: GNU Lesser Public License -- see this website for details.
Official Mars Society Image (Copyrighted): this image belongs to the Mars Society and they have provided written permission to use with Marspedia.
Copyrighted Image: this image belongs to somebody else and they have provided written permission to use with Marspedia.
Unknown: I don't know what license this image has (not recommended to select; your content may be removed.)
Of these choices, Public Domain and Copyrighted Image (fair use or used with permission) will be the most common. The choice of “Unknown” is really not an acceptable choice when uploading a graphic; it will be reviewed by Marspedia Project staff and likely removed to comply with our policies.
Regarding Copyrighted Images, Fair use is a legal doctrine that promotes freedom of expression by permitting the unlicensed use of copyright-protected works in certain circumstances. Section 107 of the Copyright Act provides the statutory framework for determining whether something is a fair use and identifies certain types of uses—such as criticism, comment, news reporting, teaching, scholarship, and research—as examples of activities that may qualify as fair use. Section 107 calls for consideration of the several factors in evaluating a question of fair use. One of these factors relates to use for nonprofit educational purposes. It reads as:
Purpose and character of the use, including whether the use is of a commercial nature or is for nonprofit educational purposes: Courts look at how the party claiming fair use is using the copyrighted work, and are more likely to find that nonprofit educational and noncommercial uses are fair…
https://www.copyright.gov/fair-use/more-info.html
However, Marspedia will not be party to any court proceedings related to copyright infringement. Marspedia will remove any graphics that are subject to such legal suits.
Tutorial E - Advanced Editing - Introduction to Wikitext (Wiki markup code) and the SourceEditor
Note: For 99.99% of your edits in Marspedia, you will not have to know how the use the Source Editor. This is like editing source html pages in a text editor. It just isn’t necessary this days, but sometimes a little knowledge of the underlying code will help you track down a problem in how the wikicode has been interpreted and compiled into PHP for display on your browser.
Wikitext - also known as Wiki markup or Wikicode - consists of the syntax and keywords or characters used by the MediaWiki software to format a page. Ref: https://en.wikipedia.org/wiki/Help:Wikitext
You can see the underlying wikitext source code associated with any wiki page by viewing the page with the Source Editor. The Source Editor has its own “”edit toolbar.” Ref: https://en.wikipedia.org/wiki/Help:Editing
In this tutorial we’ll use the Source Editor on the MediaWiki page to illustrate what the code looks like and we’ll make a minor line edit to show how that is done.
- Open https://www.mediawiki.org/wiki/VisualEditor:Test
- In the Welcome to MediaWiki box, click on “Switch to the source editor.” You’ll see a plain text version of the page with some special characters at the top of the page and a menu with some special wikitext tags at the bottom of the edit page. Scroll to the bottom of the plain text window and place your cursor below the last line.
Let’s add a category to this page at this location. In the special wikitags menu at the bottom
- Click on [[Category:]] and that will appear at your cursor in the text.
- Now edit it to [[Category:Test1]]
- Click Publish Changes
You will find that Test1 has been added to the Categories list at the bottom of the page.
You can learn how to create (or at least understand the code) for tables and lists using wikitext tags in the help page https://en.wikipedia.org/wiki/Help:Wikitext
That’s all we need for now.
Tutorial F - Adding Categories to a Marspedia page using the SourceEditor
In Marspedia, the VisualEditor method of adding categories from a drop down box currently does not save the chosen item to the page. While we determine a fix for this, the working alternative is to use the SourceEditor to add one or more Categories by adding the wikitext line [[Category:<CategoryName>]] to the page wikitext, as taught in Tutorial D.
We’ll repeat that description here as applied to Adding a Marspedia category.
In the Marspedia search box,
- Search for “Marspedia:New Category Hierarchy”
- Examine the outline list of categories and choose 1-3 categories that you want to apply to your page.
- Use the Category Tree links in the Definitions of the Top-Level Categories to determine the exact spelling of each category or subcategory.
Let’s choose to use the category “Mars Society”. Write it down for reference.
Now go back to your User page. This time click Edit Source in the top menu. You will see all the text on your page in plain text type and you may see some other characters like ====. These are wikitext tags - (you may be familiar with xml tags) that help to format the page for html display to your browser. If you want to learn more about these tags and how you can add them to the plain text editor, you can check out https://meta.wikimedia.org/wiki/Help:Wikitext_examples
I suggest that you put that off for another day and after several cups of coffee. You don’t really need this detailed knowledge to add a category to your page, so continue below.
- In Source Editor window scroll to the bottom of the page
- Hit Return to move to a new line.
- Type [[Category:Mars Society]]
- Click Save Changes
Note that the last line of your page now has a Categories: line in gray that includes a clickable “Mars Society” link that will display all pages in Marspedia with that Category. Try it. You may want to delete the Mars Society category from your User page by going back and editing the page with the SourceEditor.
Thank you for your diligence in completing these tutorials. You now fully qualify as a reviewer/contributor who can use the Editor in Marspedia to accomplish your goals. Congratulations!
If you have suggestions on how to improve these tutorials please email fcrossman@marssociety.org
